
Feeding Sourdough Starter: Complete Guide for a Healthy and Active Starter
If you want beautiful homemade bread with a rich flavor and airy texture, understanding feeding sourdough starter is one of the most important skills to learn. A sourdough starter is a living culture of wild yeast and beneficial bacteria that needs regular care. When fed correctly, it becomes strong, bubbly, and ready to help your dough rise naturally.
Many beginner bakers struggle because they are unsure when to feed their starter, how much flour to use, or what consistency it should have. Once you understand the basics, feeding your starter becomes simple and rewarding. This guide explains everything you need to know so your starter stays healthy and active.
Why Feeding Sourdough Starter Matters
A sourdough starter feeds on flour and water. The natural yeast and bacteria consume sugars in the flour and create gas, acids, and flavor. Over time, the starter runs out of food and needs fresh flour and water to keep thriving.
Regular feeding sourdough starter helps maintain strong fermentation, improves flavor, and ensures the starter rises dough effectively. A neglected starter can become weak, overly acidic, or sluggish. With a good routine, your starter can last for years or even decades.
Understanding Sourdough Starter Feeding Ratio
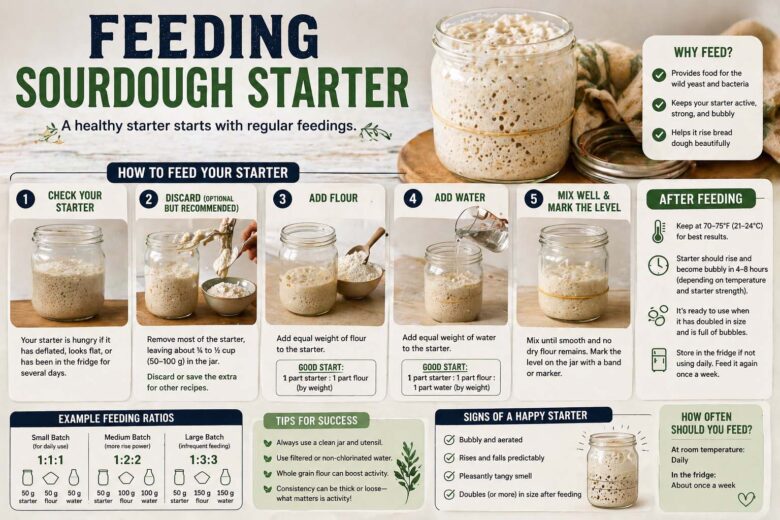
The term sourdough starter feeding ratio refers to the amount of starter, flour, and water used during each feeding. Ratios are usually written as starter:flour:water.
For example, a 1:1:1 ratio means equal parts starter, flour, and water by weight. If you use 50 grams starter, you add 50 grams flour and 50 grams water. This is a common ratio for daily maintenance.
A 1:2:2 ratio means one part starter with twice as much flour and water. This gives the starter more food and can slow fermentation slightly, making it ideal for warmer kitchens.
A 1:5:5 ratio is often used when building a starter for baking because it creates a strong rise and reduces acidity. Choosing the right ratio depends on room temperature, feeding schedule, and baking goals.
Basics of Sourdough Starter Feeding
Proper sourdough starter feeding starts by discarding a portion of your existing starter. This helps control acidity and keeps the starter balanced. After discarding, mix in fresh flour and water until smooth.
Use unbleached flour whenever possible. Many bakers prefer bread flour or whole wheat flour because they contain nutrients that encourage activity. Filtered water can also help if your tap water contains high chlorine levels.
After feeding, keep the starter in a clean jar with enough room to rise. Cover it loosely so air can escape while keeping contaminants out. Store it at room temperature if you bake often, or in the refrigerator if you bake less frequently.
Best Sourdough Starter Feeding Schedule
A consistent sourdough starter feeding schedule is key to success. If your starter stays at room temperature, feeding once or twice daily is common depending on temperature and activity level.
In a warm kitchen, the starter ferments faster and may need two feedings per day. In a cooler room, once daily is often enough. Watch how quickly it rises and falls to understand its rhythm.
If refrigerated, feed it about once per week. Remove it from the fridge, let it warm slightly, discard some starter, feed it, and allow it to become active before returning it to cold storage.
Before baking, many bakers give refrigerated starter one or two room-temperature feedings to wake it up fully. This creates stronger fermentation and better bread rise.
Feeding Sourdough Starter Ratio for Different Situations
Choosing the right feeding sourdough starter ratio can improve your baking results. If your starter seems too sour or weak, a higher ratio like 1:3:3 or 1:5:5 gives it more fresh food and balances acidity.
If you need your starter ready quickly, use a lower ratio such as 1:1:1 and keep it warm. It will peak faster because the existing yeast population is relatively high.
For overnight preparation, a higher ratio works well because it takes longer to peak. Many bakers feed at night and bake the next morning once the starter is fully active.
Understanding these ratios gives you control over timing, flavor, and performance.
Signs Your Starter Is Healthy
A healthy starter shows several clear signs after feeding. It rises noticeably, often doubling in size. The surface becomes bubbly, and the texture looks airy and elastic.
The smell should be pleasantly tangy, mildly fruity, or yeasty. A sharp alcohol smell means it is hungry and needs feeding. Liquid on top, often called hooch, is another sign the starter needs fresh food soon.
When stirred, an active starter feels light and full of bubbles. These are excellent indicators that your feeding sourdough starter routine is working well.
Common Feeding Mistakes to Avoid
Many beginners overcomplicate sourdough care. One common mistake is feeding by volume instead of weight. Using a kitchen scale creates better consistency because flour amounts vary by cup measurement.
Another mistake is forgetting to discard enough starter. Without discarding, the jar grows quickly and acidity builds up faster than fresh food can balance it.
How to Know When Starter Is Ready for Baking
After feeding, your starter will rise, peak, and then slowly fall. The best time to bake is usually at or just after peak rise when yeast activity is strongest.
Long-Term Success With Feeding Sourdough Starter
The beauty of sourdough is that it becomes easier over time. Once you understand your kitchen environment and starter habits, maintaining it becomes second nature.
Conclusion
Mastering feeding sourdough starter is the foundation of successful sourdough baking. By learning the right ratios, using a reliable feeding routine, and watching how your starter behaves, you can keep it strong and active for years.


